
Transfer files to/from Android 6 via USB under Devuan/Debian
Posted by alexkemp on 27 July 2018 in English. Last updated on 23 June 2022.My home PC is now Devuan and I’ve lost all trace of how I previously set Debian up to be able to transfer osmtracker files between my home PC and my Android 6.0.1 Marshmallow smartphone connected using a USB cable. So, here it all is again, but this time under Devuan 2.0 (ascii).
tl;dr:
1. On the phone enable Developer Options and change the USB default to MTP.
2. On the Desktop install jmtpfs + mtp-tools, then mount
3. Use Thunar to access mounted disk + transfer files
Xfce is my desktop environment & Thunar the File Manager. Once mounted (below) and whilst the phone screen is unlocked it is possible to browse/copy the phone directories with Thunar in the normal way. The jmtpfs README states that “tools like find and rsync work as expected”, although I have not yet explored this.
One item that is currently missing is that, whilst USB Mass-Storage devices are auto-mounted upon insertion & can be stopped/unmounted from Thunar, that is not yet available for me with the phone. You thus need to use the terminal to both mount, and to unmount the phone before removal.
There is every chance that you need root for this on your phone. I wanted to be able to mount the phone from my desktop and thus then use either GUI or terminal to move files created whilst surveying using OSMTracker on my smartphone.
Here is the info detected on the smartphone model after installing mtp-tools:
$ mtp-detect

Listing raw device(s)
Device 0 https://wiki.openstreetmap.org/wiki/Tag:(VID=19d2 and https://wiki.openstreetmap.org/wiki/Tag:PID=0307) is a ZTE V880E.
   Found 1 device(s):
   ZTE: V880E (19d2:0307) @ bus 1, dev 6
Device info:
   Manufacturer: Vodafone
   Model: VFD 600
- Set up Android for MTP
a. Find the “Build Number” and tap on it 7 times to get Developer options
(for mine: Settings | System | About phone) (there are different methods for different android versions)
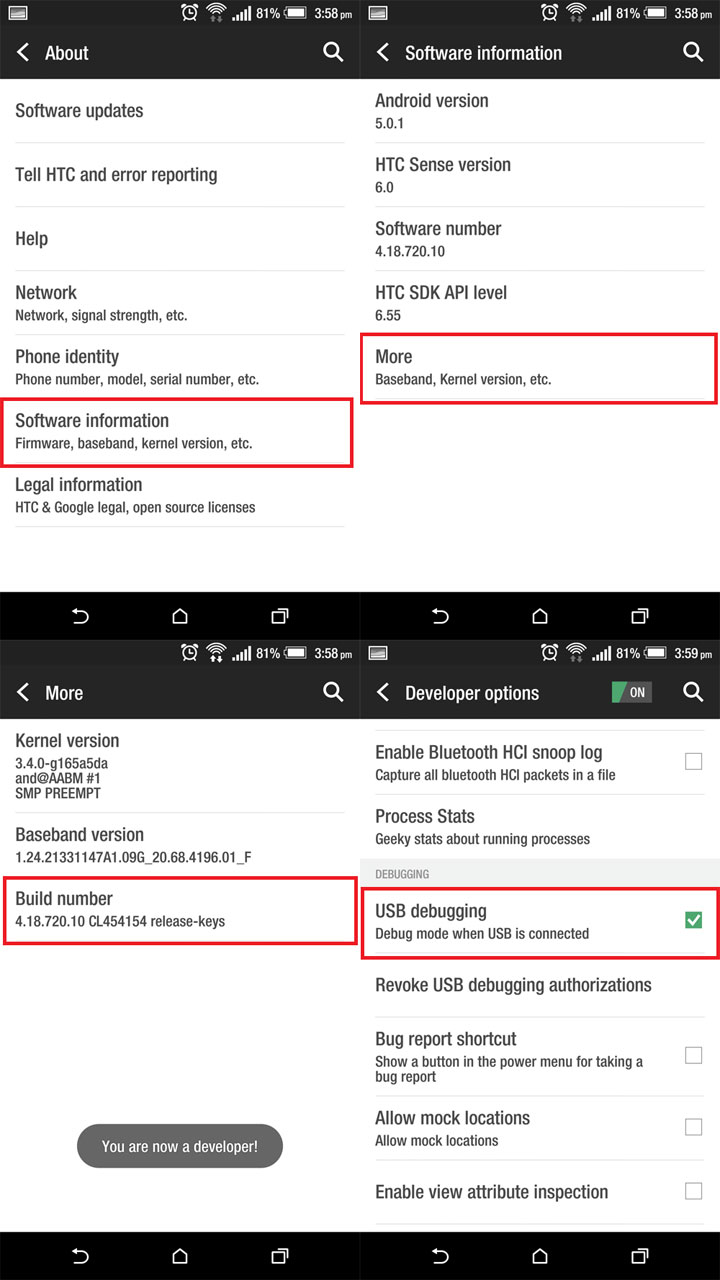 b. Now use developer options to change default USB setting
(for mine: Settings | System | Developer options | Select USB Configuration)

(Choose MTP or PTP)

On my model plugging in the USB cable will still allow it to charge, even whilst the default setting is now MTP. Tapping on the USB connection when plugged in will give options to change the current setting. - Set up Desktop for MTP
Use Synaptic (whatever) to install gvfs-backends (which also installs mtp-tools) and jmtpfs. The phone is then mounted via the terminal as follows (remember, the phone screen needs to be unlocked else nothing happens):–
$ jmtpfs /a-previously-created-directory
Unmount it as follows:–
$ fusermount -u /a-previously-created-directory
- Use Thunar to access the mount point
Let’s assume that the phone is mounted at/media/you/disk. On my model photos are currently stored at/media/you/disk/Internal storage/DCIM/Camera/. They can be then be copied in the normal way.
Background
Android before Marshmallow could be directly mounted under Linux via a USB cable. That was damn useful if you wanted to conduct bit-level operations on the Android system, but tended to be a brown-trouser job for company owners. From Marshmallow on Google has made use of the Media Transfer Protocol (MTP) as the method to communicate over USB.
jmtpfs enables mounting the phone as a FUSE+libmtp filesystem.
Update 23 June 2022
The previous image URLs had all become defunct.
Discussion